The Live-Monitor
With the live function of the Blackhole sports shooting app, it is possible to recognize and evaluate hits on paper targets during firing. The shooter receives a real-time analysis of the shots they have just fired.
The resulting shot image can still be edited in the Blackhole app and saved and archived in the same way as conventional target evaluations.
For commissioning, a cell phone scope or an external camera with an RTSP protocol is required to bridge the optical distance between the evaluation device and the target being shot at. Cell phone scopes are supported from version 1.7, support for external cameras is still in progress.
Where can I find the monitor?
You can find the live monitor under Main menu -> Monitor.

How do I use the monitor?
1. First set up your shooting range so that you can easily see your cell phone while you are shooting. It should be anchored in a stable, vibration-free holder that cannot move freely or be easily touched by your shooting arm.

2. Place a target in the bullet trap. Ensure that your target is sufficiently illuminated. You may be able to use a standard ring light if the dimensions of your target allow it.

3. It is important that the lighting conditions do not change. Undefined shadows cast outdoors, flickering lighting or movement of the pane prevent stable live evaluation and must be eliminated in advance.
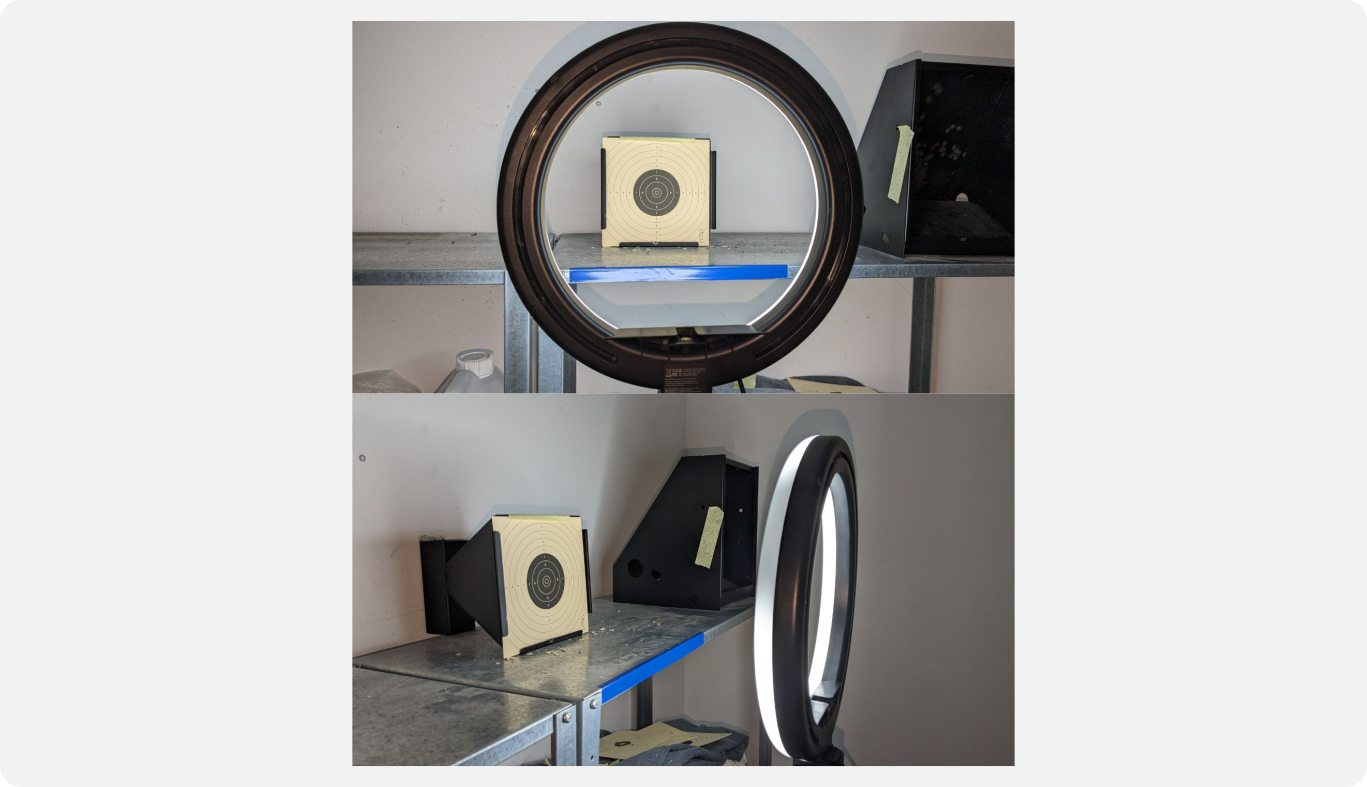
4. Install your spotting scope according to the instructions, start Blackhole and switch to the monitor view via the side menu.

5. You should now see a live image in the upper third of the display. Align your camera lens so that the screen is centered in the image and completely in the field of view. Use the zoom slider on the right-hand side of the screen to position the mirror optimally.

6. The camera system must be calibrated the first time it is used. This is necessary every time the system is subsequently moved significantly or relocated.
7. Open the options menu (wrench button) and select the target you are using via the target selection. If the button for the options is covered by your spotting scope clamp, unfold the middle menu, where all the important navigation elements are once again available.
8. Select the caliber with which the target is to be shot in the same way.
9. Optionally, you can use one of your sets in which certain options are already preset. For more on sets, see here.
10. Close the options menu so that you can see the full screen again.
11. Open the middle menu for calibration (white information bar below the live image, marked with two arrows)
12. Press the “Calibration” button once: The system switches to calibration mode 1, which can be recognized by the symbol in the bottom left corner of the live image. An auxiliary ring appears in the image, which represents the quality of a recognized target. A green ring around the inside mirror of the target means that it has been optimally recognized. The mirror quality is also displayed as a numerical value in the info field. A value between 0.98 and 0.99 is sufficient for stable real-time detection.
13. Align your camera system and/or your screen until you have reached an optimum value. Also make sure that the entire screen is positioned to fill as much of the frame as possible.

14. Press the calibration button again and switch to calibration mode 2. An auxiliary view appears in the live image, which in the best case is completely black. If flickering white artifacts can be seen there, repeat steps 11-13.
15. If the auxiliary view is homogeneously black, wait a few minutes and observe the image. If white artifacts appear again after a while, your system is not yet in the resting position. This means that your phone may not have settled yet or your mount is suboptimal. Improve your mounting system or wait until your system has settled down. Then repeat steps 11-14.

16. If a homogeneous black image can be observed over a reasonable period of time, you can fire a calibration shot at the target in this state. The aim here is to hit the black inner mirror, as this has a more stable information value.
17. The bullet hole should be visible as a single white dot on the black auxiliary image. Slight noise in other parts of the image can be ignored for the time being.
18. The shot size is displayed in the information field. This should be at least above 80 for a hit in the black. A flickering of the value is irrelevant. Observe the value. If it is significantly below 80, the sensitivity of the value can be adjusted via the Options menu->Image detection options. If the value is below 40, or if no impact is displayed at all in the auxiliary image, the impact is too small. If necessary, use the zoom to position the target larger in the image.

19. If steps 11-18 were successful, the calibration is now complete. Press the calibration button again to switch to live mode. The system is now ready for live evaluation.
20. Carefully press the monitor button to start the evaluation. Wait for the system to be released, which is indicated by a flying bullet symbol and a note in the information bar.
21. Fire at your target and observe the detection on your cell phone display.
22. The system always requires a short moment between individual shots for correct evaluation. Only shoot at the target when the system is released.

23. Continue firing until you have placed the desired number of hits. Then press the Stop button.
24. You can reset the entire shot list using the delete button. All unsaved data will be lost. The system is then ready for use with a new target.
What do the symbols on the screen mean?
Live mode
In this state, only the live image from the camera is displayed to set up the system. This is the initial mode for most monitor functions.
Do not touch – system is working
If this symbol is visible, the monitor is evaluating the current image or preparing an initialization. The status bar displays further information about the status. Under no circumstances should the system be moved or the camera covered. Wait until the system automatically switches to the next status.
Fire at will – monitor is ready to record
The monitor is in recording mode. You can now shoot at your target and observe the evaluation. Do not cover the camera and do not move the system. It is possible to lightly touch your cell phone for control input. However, be careful not to cause the system to vibrate too much.
Calibration mode 1
This is the first stage of calibration. Here, the target should be optimally aligned in the camera image. The quality of the inner ring is permanently displayed in the information bar. See step 12 of the instructions.
Calibration mode 2
In this mode, an auxiliary view is displayed to help you set up a stable system. Any movement and displacement of the camera is indicated by white artifacts. See from step 14 of the instructions.
How can I save my shooting data in my shooting logbook?
The data that the monitor records in one run can be saved in Blackhole as usual. To do this, the recording must be stopped and the system must be in live mode.

After recognizing the first hit, a new button with a target flag on it appears on the screen. By pressing this button, the view changes to the editor, in which you can edit and save the shot data as with a normal scan. For more information, see Save data.
Known problems and solutions
The system does not recognize the pane in calibration mode 1
Have you selected the correct target in the options? If you are shooting at insert mirrors without a carrier target, make sure you select the corresponding insert target in Blackhole. If your target is in a carrier instead, select the complete target.
The pane should be completely visible in the camera image. Adjust the view using the zoom control.
In calibration mode 2, the view always remains black, even if I have fired at the target.
Some cell phone models have a low contrast ratio so that black hits on a black background are not recognized well. Blackhole offers the option of adjusting the exposure times to generate a higher contrast.

To do this, go to “Camera options” in the options menu. Switch off the automatic exposure and adjust it manually using the two sliders: “Exposure” and “Gain”.
Exposure is the integration time of the camera
Amplification means an internal scaling of the image before processing.
As these settings can vary greatly from device type to device type, no exact value range can be specified. This must be determined experimentally for each cell phone model.
Turning the gain down relatively far and the exposure time up has often proven to be a good idea. Observe your system after every change to the settings. Too long an exposure time can lead to a slowdown in the video image.
During the live evaluation, one of my shots was not recognized or did not trigger recognition
The monitor triggers the evaluation of a shot if it has previously triggered the process. In the case of double shots, which are still clear, it can happen that these cause too small a difference in the image and therefore do not trigger the recording process.
In such cases, try to trigger a manual recording:

After pressing the manual button, Blackhole will try to analyze even small and inaccurate suspected shots.
Please note that double shots that overlap too far into other shots cannot be evaluated. However, you can add these shots later in the usual editor. See Edit hits.
Are there any restrictions on using the monitor?
Basic users can set up the monitor and test it for as long as they like. However, in the basic version of Blackhole, only a maximum of 3 shots can be evaluated simultaneously. The system is only ready for a further 3 shots after the listed hits have been deleted. In addition, the values cannot be saved in the shooting log.
A Premium subscription is required to remove this restriction.